
Updated 28 Nov 2003
If you are reading this article, you are most likely aware that so called "stacking" of images can yield significant benefits, particularly if the images are grainy (noisy). Stacking images, if done properly, can not only reduce grain noise, it will allow more fine detail to be revealed and can also enhance color content. However, for the benefits to be realized, stacking has to be done properly. PhotoShop is a very popular program that is widely used by astrophotographers, however it is not the best choice for stacking images (astronomical images anyway). This is because PhotoShop lacks a layering function known as "add". It has many other layering functions, including difference (same as subtracting), however somehow add got left out. This article will describe a method to stack astronomical images using PhotoShop software. Also included is a mathematical and analytical proof that the method described does indeed perform the desired function.
PhotoShop can be used to do a mathematically proper stack (add) of astronomical images. It is assumed that the images to be stacked were all taken under the same conditions (same object, same exposure length, same temperature, etc). The basic method to do a proper stack in Photoshop is as follows: Take a base image, paste the second image over it (using "normal" layering mode), and then set the Opacity of the newly stacked layer to exactly 50%. Then flatten the image and save it off as a new file. The down side of this method is that only two images can be stacked (properly) at any one time. More can be stacked on to the composite, but these have to be done in successive groups. For example to stack 4 images, first stack the first two and save it off, then stack the second two and save it off. Then, stack these two composites. This method can be continued, but each successive stack requires more images (to stack 8 images requires two sets of 4-stacks (which in turn are created from two sets of 2-stacks, etc). Overall it can be a cumbersome process if a large number of images are to be stacked, however if PhotoShop is the only software available to the user, it will work!
First, to better understand this article, the reader should have some idea of imaging basics. There are many types of images used in the computer world; this article will focus on what are known as 24 bit color images. A number of file formats can support such images, including the popular JPEG, BMP and TIFF formats. A digital image consists of large number of pixels. A pixel is one point in the image; it is not uncommon for an image to have millions of pixels (most digital cameras today have CCD chips that are around 3 megapixels or more). For a 24 bit color image, each pixel in the image contains three channels; these are the red, green and blue channels. Each of the three channels contains 8 bits of data; 8 bits of data allows 256 different values per channel. The computer generates the colors from the values of each of the three channels. The red channel can take on a value of anywhere from 0 to 255, as can the green and blue channels. If all the channels have a value of zero the color of the pixel is black, and if all the channel values are 255 the color is white. How many different colors are possible? The answer is 256 x 256 x 256 = 16,777,216. You may have heard of computer gear being able to show 16 million colors; this is where this comes from.
So, at this point, it should be understood that (for a 24 bit color image) the image consists of a great many individual pixels, and each pixel contains three channels. Each channel represents a color (red, green and blue). Each color channel can take on values between zero and 255. There are approximately 16 million colors that can be represented by this system, each one has a unique number (between zero and 255) assigned to each color channel.
Here we show some images that contain various colors, and we also show the pixel value of each of the channel. This will help to give some idea of how the color channels interact to generate various colors. We will start with the primary colors, that is, red, green and blue.
This is a color block with RGB values of 255, 0 , 0. The only channel with a value is the red channel, and the red channel is at its maximum possible value. Hence, this is the brightest pure red that can be generated.

This is a color block with RGB values of 128, 0 , 0. The only channel with a value other than zero is the red channel, however it is less than that in the first channel. This color is still pure red, however it is a darker red than the one above.

This is a color block with RGB values of 0, 255 , 0. The only channel with a value is the green channel, and the green channel is at its maximum possible value. Hence, this is the brightest pure green that can be generated.

This is a color block with RGB values of 0, 128 , 0. The only channel with a value other than zero is the green channel, however it is less than that in the first channel. This color is still pure green, however it is a darker green than the one above.

This is a color block with RGB values of 0, 0 , 255. The only channel with a value is the blue channel, and the blue channel is at its maximum possible value. Hence, this is the brightest pure blue that can be generated.

This is a color block with RGB values of 0, 0 , 128. The only channel with a value other than zero is the blue channel, however it is less than that in the first channel. This color is still pure blue, however it is a darker blue than the one above.
Now we show some images that have non zero values in more than one color channel.

This is a color block with RGB values of 255, 255 , 255. All color channels are at maximum value, and the resulting color is white.

This is a color block with RGB values of 128, 128 , 128. All color channels are at their mid values, and the resulting color is gray. One could think of this as a "darker shade of white".

This is a color block with RGB values of 0, 0 , 0. All color channels are at their minimum values, and the resulting color is black. One could think of this as a "the darkest shade of white".

This is a color block with RGB values of 128, 160 , 41. This color is sort of on the green side; this can be deduced from the pixel values. The green channel has the strongest level.

This is a color block with RGB values of 191, 65 , 217. The blue channel is strongest here, but the red channel is not far behind. The green channel is weakest here. Hence, this color takes on a pinkish tone.
The examples above are just a handful of the 16 plus million possible colors that can be generated in this manner. Many of the colors would be virtually indistinguishable from each other with the human eye (for example images with pixel values of 121, 45, 203 and 121, 45, 204). Why did we go into all of the above detail? It will help in the understanding of the proof that will follow. Shortly we introduce an image with multiple colors that will be used in the proof of the stacking method desribed herein.
Image Stacking Defined: Part of the reason for going into the above details is to allow the reader to understand what is really going on when an image is "stacked". Basically, when an image is stacked with another (both have the same pixel dimensions), this is what should happen: each pixel value for each image is divided by 2, then the corresponding pixels from each image are added together (alternatively, the pixel values could be added directly and then the result divided by two). Let's look at an example. Say we have two pixels from two different images, they have RGB values as follows:
122, 46,14 and 33, 218, 93.
If we divide each pixel value by two, we have:
61, 23, 7 and 16.5, 109, 46.5.
Now, if we add the corresponding RGB pixel values (the divided ones), we get:
77.5, 132, 53.5. The computer will round any pixel values that do not come out to an integer, so we end up with:
78, 132 and 54.
Is this correct? Yes. These pixel values differed quite a bit in their original values and hence they are a good example of pixels that contained random noise.
Why do we need to divide each pixel value by 2 before adding? If we did not, we would probably "clip" parts of the image. For a 24 bit color image, the maximum value that any one color channel can take on is 255. So, if we added a pixel to another pixel (both with large channel values, say all over 128), we would exceed the maximum 255 value. This would basically render that part of the image as white. Image detail would be permanently lost.
More sophisticated programs for stacking astronomical images can stack many more than just two images at a time. For example, 100 images might be stacked at a time. In this case, the pixel value of each image must essentially be divided by 100 before the add takes place (or, they could all be added directly and the final result divided by 100). Also, it is very important for the stacking software to maintain what is known as proper "word length" when stacking large numbers of images. The details of this are beyond the scope of this article. Suffice to say for now, if care is not take in ensuring proper word length, detail will be lost as a result of the stacking process (once the detail is lost in this fashion it cannot be retrieved).
Let's say you have two images you want to stack. It is assumed that both images are about the same size (in pixels by pixels) and that both are of the same subject and taken under the same conditions (same exposure time, same film or CCD, etc). The instructions below should help you walk through the process:
The above procedure is for stacking two images. If you want to stack 4 images, stack them in pairs as described above, then stack the two composites. I have not found a mathematically proper way to stack more than two images at one time using PhotoShop (there may be a way but I have not discovered it yet).
To prove that the above method works, we will employ two test patterns that I generated using MATLAB and PhotoShop (I used MATLAB to generate the segments of the images, I used PhotoShop to assemble them into the test patterns). The first of two test patterns is shown below:
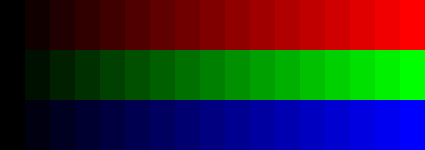
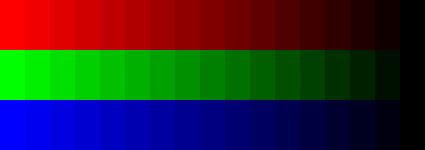
The above test pattern image contains 17 shades of each of the three primary colors red, green and blue. For the red segment, the pixel values for the green and blue channels are all zero, however for each successive step the pixel value for the red channel increases. The values are 0, 16, 32, 48, 64, 80, 96, 112, 128, 144, 160, 176, 192, 208, 224, 240, 255. The same basic principal applies to the green and blue portions of the image. Next, we consider the second of the two test patterns (below). This pattern is the same as the first one above except that it has been reversed. That is, the pixel values for each channel are flipped compare to the original image. For the red channel, the pixel values are 255, 240, 224, 208, 192, 176, 160, 144, 128, 112, 96, 80, 64, 48, 32, 16, 0 (the same principal applies to the green and blue channels).
The proof in showing that the above described stacking method works properly will be done by stacking the two test pattern images above. What will the result be? Before we go ahead and do the actual stack in Photoshop, we will predict what the result should be. At first glance it may seem difficult, but in fact it is easier than one might initially suspect. To see why, let's look at the pixel values for the red segment of the first image (we leave out the green and blue pixel values [all zero in the red channel] for clarity):
0, 16, 32, 48, 64, 80, 96, 112, 128, 144, 160, 176, 192, 208, 224, 240, 255
Now, in accordance with proper stacking rules for stacking two images, we divide each of these values by two and the result is:
0, 8, 16, 24, 32, 40, 48, 56, 64, 72, 80, 88, 96, 104, 112, 120, 128 (rounded)
Now, lets do the same for the "flipped" test pattern. The original pixel values are:
255, 240, 224, 208, 192, 176, 160, 144, 128, 112, 96, 80, 64, 48, 32, 16, 0
and dividing all of these by two yields:
128 (rounded), 120, 112, 104, 96, 88, 80, 72, 64, 56, 48, 40, 32, 24, 16, 8, 0
Now, we take the corresponding pixel values and add them. We get:
Basically, we see that the added values (for the red channel result in a value of 128, 0, 0 for all segments of the image... this means that stacking the above two images will (for the red channel) result in solid medium red bar all the way across! The same follows for the green and blue channels if one works out the math. So, we expect that if we stack these two images in PhotoShop (using the procedures outlined above), we should get a final image with only three unique colors: a red bar with RGB value 128, 0, 0, a green bar with RGB values 0, 128, 0, and a blue bar with RGB values of 0, 0, 128. Here is the resulting image obtained in PhotoShop by stacking the two test patterns above:

The image obtained above has the predicted RGB values. In this section we first predicted what we should see in the final stacked image. Upon stacking the two test patterns (and checking the RGB values for each segement of the image in PhotoShop) we confirm that the actual result matches the prediction. Because this operation is a linear operation, if it works for one set of images it must work for all images.
For stacking to work well, there are some basic premises that should be followed. These are listed below:
The folliwing related articles may be of interest to those who have read the current article:
End of Article (for now).
PhotoShop is a powerful program that allows a tremendous number of operations to be done on digital images. PhotoShop does offer a number of other operations, some of them are listed below:
The goal of this article is to try to show (and describe mathematically) what exactly all of these operations actually do.
Our baseline for the forthcoming analysis is an image called a "calibration bar". This image is basically an image that has 17 sections, each section is a step in the gray scale. For purposes of this article (for now anyway) a gray scale image is used. This image is an 8 bit gray scale image. Eight bits allows for a digital count value ranging from 0 to 255. So, in an 8 bit gray scale image, there are 256 possible shades of gray ranging from black (0) to white (255). The calibration bar contains sections that correspond to the following bit levels: . The calibration bar was generated using MATLAB software (see code at bottom of this page).

Photoshop can do many operations on images, including what is called "layering" of images. An image with layers is basically a "stack" of images, that is, one image layered over another. PhotoShop allows many layers in an image and it also offers a number of variations in how the layers will be combined to form the final image. The analysis below will show what happens when we take the calibration bar image, stack it with a copy of itself, and apply the various layering options. The results will take several forms. First, we will show the resulting numeric grayscale pixel levels (possible values = 0 to 255) for each of the 17 segments in the calibration bar. Also, we will show a graphical plot of the curve that results from stacking the images with the various processing modes. Finally a discussion will round out each layering option.

to be added later

The result of stacking two calibration bars using the "disolve" option results in the image shown above. The numeric values of gray scale for the 17 segments are as follows: 0, 16, 32, 48, 64, 80, 96, 112, 128, 144, 160, 176, 192, 208, 224, 240, 255. A plot of this response is shown below:


The result of stacking two calibration bars using the "multiply" option results in the image shown above. The numeric values of gray scale for the 17 segments are as follows: 0, 1, 4, 9, 16, 25, 36, 49, 64, 81, 100, 121, 145, 170, 197, 226, 255. A plot of this response is shown below:
So, what exactly is PhotoShop doing in the "multiply" option? One would certainly expect that the bit values of the two images being processed are multiplied. At a quick glance of the pixel output levels it would appear that this is not the case (however the plot does suggest multiplication). However, PhotoShop works with pixel values that are "normalized" to the value of one (1). That is, basically the bit value of the pixel (0-255) is divided by 256 (2^8). Once this is done, the pixel values for each image layer are multiplied together. Lets look at an example for the grayscale value of 64 (this is one of the levels in the original "calibration bar" image). Dividing 64 by 256 results in a value of .25. This applies to both images that are being multiplied. So, when the multiplication operation is applied, the value .25 is multiplied by .25 resulting in 0.0625. To see what value this is on the traditional 0-255 range, we multiply the 0.0625 value by 256. The result of this operation is 16. So, when the multiply option in PhotoShop is used, the images truly are multiplied on a pixel by pixel basis.

The result of stacking two calibration bars using the "screen" option results in the image shown above. The numeric values of gray scale for the 17 segments are as follows: 0, 31, 60, 87, 112, 135, 156, 175, 192, 207, 220, 231, 239, 246, 251, 254, 255. A plot of this response is shown below:

So, what exactly is PhotoShop doing (mathematically) with the "screen" layering option? A look at the curve shows that it is quite different than the multiply option.


Use your browser's "back" button, or use links below if you arrived here via some other path:
This page is part of the site Amateur Astronomer's Notebook.
E-mail to Joe
Roberts
Images and HTML text © Copyright 2003 by Joe Roberts. Please request permission to use photos for purposes other than "personal use".